Holds a CTSystem together with the information about the system settings for all views from which projection images shall be simulated. More...
#include <acquisitionsetup.h>

Classes | |
| class | View |
| Holds the information about the system settings for a particular view. More... | |
Public Types | |
| typedef std::shared_ptr< const AbstractPrepareStep > | PrepareStep |
| Alias for shared_ptr to const AbstractPrepareStep. | |
 Public Types inherited from CTL::SerializationInterface Public Types inherited from CTL::SerializationInterface | |
| enum | { Type = -1, UserType = 65536 } |
Public Member Functions | |
| AcquisitionSetup (const CTSystem &system, uint nbViews=0) | |
| AcquisitionSetup (CTSystem &&system, uint nbViews=0) | |
| AcquisitionSetup (std::unique_ptr< CTSystem > system, uint nbViews=0) | |
| AcquisitionSetup (std::unique_ptr< SimpleCTSystem > system, uint nbViews=0) | |
| AcquisitionSetup (uint nbViews) | |
| AcquisitionSetup (const AcquisitionSetup &other) | |
| AcquisitionSetup & | operator= (const AcquisitionSetup &other) |
| AcquisitionSetup (AcquisitionSetup &&other)=default | |
| AcquisitionSetup & | operator= (AcquisitionSetup &&other)=default |
| void | addView (View view) |
| void | applyPreparationProtocol (const AbstractPreparationProtocol &preparation) |
| bool | isValid () const |
| uint | nbViews () const |
| void | prepareView (uint viewNb) |
| void | removeAllPrepareSteps (bool keepTimeStamps=true) |
| void | removeAllPrepareStepsOfType (int prepareStepType) |
| Removes all prepare steps of type prepareStepType from all views of this setup. | |
| void | removeAllViews () |
| bool | resetSystem (const CTSystem &system) |
| bool | resetSystem (CTSystem &&system) |
| void | setNbViews (uint nbViews) |
| AcquisitionSetup | subset (const std::vector< uint > &viewIds) const |
| SimpleCTSystem * | system () |
| const SimpleCTSystem * | system () const |
| View & | view (uint viewNb) |
| const View & | view (uint viewNb) const |
| std::vector< View > & | views () |
| const std::vector< View > & | views () const |
| void | fromVariant (const QVariant &variant) override |
| QVariant | toVariant () const override |
| Public Member Functions inherited from CTL::SerializationInterface | |
| virtual int | type () const |
| virtual | ~SerializationInterface ()=default |
Private Attributes | |
| std::unique_ptr< SimpleCTSystem > | _system |
| CTSystem used for the acquisition. | |
| std::vector< View > | _views |
| List of all views of the acquisition. | |
Additional Inherited Members | |
| Protected Member Functions inherited from CTL::SerializationInterface | |
| SerializationInterface ()=default | |
| SerializationInterface (const SerializationInterface &)=default | |
| SerializationInterface (SerializationInterface &&)=default | |
| SerializationInterface & | operator= (const SerializationInterface &)=default |
| SerializationInterface & | operator= (SerializationInterface &&)=default |
Detailed Description
Holds a CTSystem together with the information about the system settings for all views from which projection images shall be simulated.
The AcquisitionSetup class manages the CTSystem used during an acquisition, i.e. the simulation of multiple views with differing conditions (e.g. varying geometry). The system to be used in the acquisition is either set in the constructor or via resetSystem(). To specify the conditions for all views in the acquisition, three approaches can be used: making use of preparation protocols, specifying each view individually, or using a combination of both. These approaches are explained in full detail at the end of this description (see How to configure the views:).
To bring the system managed by the setup into the state for a certain view, use prepareView(). This will apply all preparation steps associated with that particular view.
When using the 'ctl_qtgui.pri' module (or the submodule 'gui_widgets_3d.pri') within the project, you can use the gui::AcquisitionSetupView class to visualize the setup.
Before using an AcquisitionSetup, the method isValid() can be used to check whether the current configuration is ready to use. Unless isValid() is true, using the setup in a simulation, calling prepareView() on it, or trying to visualize the setup, might cause an exception.
How to configure the views:
- Using preparation protocols: preparation protocols are a convenient way of specifying conditions for the whole acquistion in a single step. The protocols can describe many different things, such as geometry information (i.e. the acquisition trajectory) or dose modulation effects. To use a preparation protocol in your acquisition, first specify the number of views that the acquisition shall contain (either directly in the constructor or via setNbViews()). Aftwerwards, apply the desired protocol to your setup using applyPreparationProtocol(). You might want to check whether the protocol can be used with the system specified in your setup before trying to apply it using AbstractPreparationProtocol::isApplicableTo(). In the following example, we create a setup that uses a GenericTubularCT (i.e. it has a tubular gantry) and investigate two different trajectories, namely a helical scan trajectory and a wobble trajectory. The wobble trajectory cannot be realized by a tubular gantry, as it lacks the degree of freedom required to do so, and thus, we should not be able to use this combination: AcquisitionSetup setup(system);setup.setNbViews(100);auto protocol1 = protocols::WobbleTrajectory(500.0);auto protocol2 = protocols::HelicalTrajectory(1.0_deg, 1.0);qInfo() << protocol1.isApplicableTo(setup); // output: falseqInfo() << protocol2.isApplicableTo(setup); // output: true// This tells us, we are not allowed to do this:// setup.applyPreparationProtocol(protocol1); // this would be improper use...// setup.prepareView(10); // ...because it results in undefined behavior here.// But we can do:setup.applyPreparationProtocol(protocol2);// If you have included the 'ctl_qtgui.pri' module (or submodule 'gui_widgets_3d.pri') in the project,// you can use the AcquisitionSetupView class to visualize the setup.gui::AcquisitionSetupView::plot(setup); // requires 'gui_widgets_3d.pri' submodule
- Adding views individually: Instead of a preparation protocol that describes conditions for all views in an acquisition at once, each view can be configured individually and added to the setup. An AcquisitionSetup::View object must contain all preparation steps required to put the system in the state that shall be used for the simulation of the corresponding view. After creation, prepare steps can be added to a view with addPrepareStep(). A view also holds the time point it corresponds to (used e.g. when projecting dynamic data). The time point is set either directly in the constructor of View or using setTimeStamp(). When configured as desired, the view can be added to the setup using addView(). Note that in case of individual adding of views, the number of views in the setup must not be set in advance, as it is automatically increased each time addView() is used (you would end up with many empty views that were created when setNbViews() was used). The following example demonstrates the creation of views with changing parameters for the C-arm gantry used in the system: AcquisitionSetup setup(system);for(uint v = 0; v < 100; ++v){// create the prepare step for our Carm gantry and ...auto gantryPar = std::make_shared<prepare::CarmGantryParam>();// ... set the source position (line parallel to the z-axis)gantryPar->setLocation(mat::Location( { 500.0, 0.0, -500.0 + 10.0 * double(v) },mat::rotationMatrix(-90.0_deg, Qt::YAxis)));// ... reduce the span of the C-arm (i.e. source-detector distance) from view to viewgantryPar->setCarmSpan(1000.0 - 4.0 * double(v));AcquisitionSetup::View view; // create a new viewsetup.addView(view); // add the view to our final setup}// If you have included the 'ctl_qtgui.pri' module (or submodule 'gui_widgets_3d.pri') in the project,// you can use the AcquisitionSetupView class to visualize the setup.gui::AcquisitionSetupView::plot(setup, 10); // we show only 10 views for better visibility
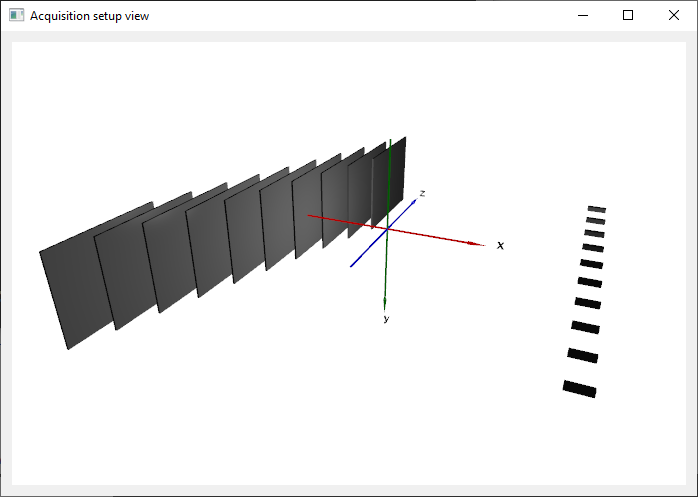 Visualization of the setup from the example. As intended, the source component moves along a line parallel to the *z*-axis and the source-detector distance decreases along the trajectory. Note that only 10 views (out of the full 100) are shown for better visibility.
 - Using a combination of 1. and 2.: After application of a preparation protocol to a setup, it remains possible to add additional views as described in option 2. Besides that, it is further possible to manipulate the views that have been created by the preparation protocol. The latter might be useful if only slight adjustments need to be made to an otherwise suitable protocol. In the following example, we take a look at a short scan trajectory with a C-arm system, where we want to add the effect from the previous example of reducing the source-detector distance from view to view: AcquisitionSetup setup(system, 100);setup.applyPreparationProtocol(protocols::ShortScanTrajectory(500.0));// go through all views in the setup and add a step to change the C-arm spanfor(uint v = 0; v < setup.nbViews(); ++v){// create an additional prepare step for the Carm gantry and ...auto gantryPar = std::make_shared<prepare::CarmGantryParam>();// ... reduce the span of the C-arm (i.e. source-detector distance) from view to viewgantryPar->setCarmSpan(1000.0 - 4.0 * double(v));setup.view(v).addPrepareStep(gantryPar); // add the prepare step to the view}// If you have included the 'ctl_qtgui.pri' module (or submodule 'gui_widgets_3d.pri') in the project,// you can use the AcquisitionSetupView class to visualize the setup.gui::AcquisitionSetupView::plot(setup, 10); // we show only 10 views for better visibility
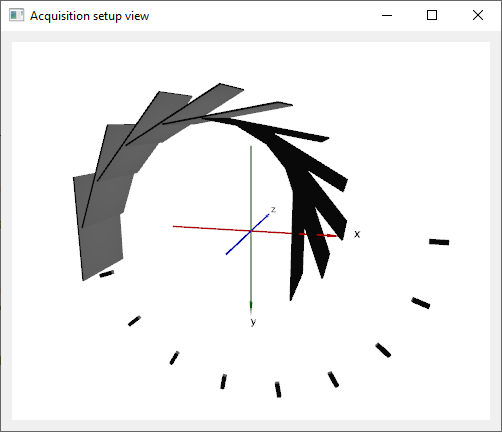 Visualization of the setup from the example. As intended, the source-detector distance decreases along the (short-scan) trajectory. Note that only 10 views (out of the full 100) are shown for better visibility.
We can also add prepare steps for other parts of the system, for example the X-ray tube. In this example, we switch the tube voltage twice during the acquisition:
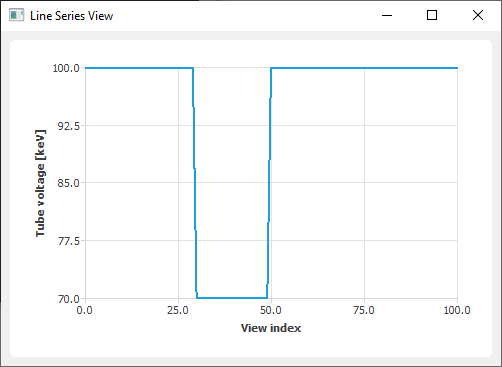
Note that in this example, it is not necessary to set the tube voltage for each view between 30 and 50, because it will not be altered by other prepare steps. Hence, it is sufficient for our purpose to just switch the voltage once (and then switch it back again). This can be different if other prepare steps are in use that also change the tube settings (esp. when using multiple preparation protocols, this is a likely option).
Constructor & Destructor Documentation
◆ AcquisitionSetup() [1/7]
Creates an AcquisitionSetup with nbViews views that uses the CTSystem system.
If nbViews = 0, make sure to explicitely set the desired number of views with setNbViews() and adjust the views for the required purpose (either individually or by use of a preparation protocol, see applyPreparationProtocol()) before using the setup. Alternatively all views can be added individually with addView().
◆ AcquisitionSetup() [2/7]
Creates an AcquisitionSetup with nbViews views that uses the CTSystem system.
◆ AcquisitionSetup() [3/7]
Creates an AcquisitionSetup with nbViews views that uses the CTSystem system.
◆ AcquisitionSetup() [4/7]
| CTL::AcquisitionSetup::AcquisitionSetup | ( | std::unique_ptr< SimpleCTSystem > | system, |
| uint | nbViews = 0 |
||
| ) |
Creates an AcquisitionSetup with nbViews views that uses the CTSystem system.
◆ AcquisitionSetup() [5/7]
| CTL::AcquisitionSetup::AcquisitionSetup | ( | uint | nbViews | ) |
Creates an AcquisitionSetup with nbViews views without a CTSystem.
Note that a CTSystem must be set explicitely with resetSystem() before the setup can be used.
◆ AcquisitionSetup() [6/7]
| CTL::AcquisitionSetup::AcquisitionSetup | ( | const AcquisitionSetup & | other | ) |
Creates a copy of other. This uses CTSystem::clone() to create a deep copy of the CTSystem member variable.
◆ AcquisitionSetup() [7/7]
|
default |
Default move constructor.
Member Function Documentation
◆ addView()
| void CTL::AcquisitionSetup::addView | ( | AcquisitionSetup::View | view | ) |
Adds the View view to this setup.
◆ applyPreparationProtocol()
| void CTL::AcquisitionSetup::applyPreparationProtocol | ( | const AbstractPreparationProtocol & | preparation | ) |
Applies the prepration protocol preparation to this setup. This means that the prepare steps created by AbstractPreparationProtocol::prepareSteps() are appended to all views in this setup. The consequences of this aspect are, in particular, that application of multiple preparation protocols is cumulative. When this is not desired, consider removing all prepare steps with removeAllPrepareSteps() before applying a new preparation protocol.
Note that changing the number of views afterwards does not take into account this application of preparation. Consequently, all views that are added later on will not contain the preparation steps from preparation.
- See also
- setNbViews().
◆ fromVariant()
|
overridevirtual |
Reads all member variables from the QVariant variant.
Reimplemented from CTL::SerializationInterface.
◆ isValid()
| bool CTL::AcquisitionSetup::isValid | ( | ) | const |
Returns true if this setup is valid. To be valid, the following conditions must be fulfilled:
- the system must be set properly (no nullptr),
- the number of views must be non-zero,
- all prepare steps in all views must be applicable to the system.
◆ nbViews()
| uint CTL::AcquisitionSetup::nbViews | ( | ) | const |
Returns the number of views in this setup.
◆ operator=() [1/2]
| AcquisitionSetup & CTL::AcquisitionSetup::operator= | ( | const AcquisitionSetup & | other | ) |
Assigns the content of other to this instance. This uses CTSystem::clone() to create a deep copy of the CTSystem member variable.
◆ operator=() [2/2]
|
default |
Default move assignment operator.
◆ prepareView()
| void CTL::AcquisitionSetup::prepareView | ( | uint | viewNb | ) |
Prepares the system of this setup for the view viewNb.
This applies all prepare step queued in the corresponding View. Steps are applied in the order they have been added to the View object.
Use this method if you want to inspect the system configuration for a certain view in the setup.
Example: reading the tube voltage of an XrayTube component for all views
◆ removeAllPrepareSteps()
| void CTL::AcquisitionSetup::removeAllPrepareSteps | ( | bool | keepTimeStamps = true | ) |
Removes all prepare steps from all views of this setup. This leaves the setup with the same number of views as it had beforehand. If keepTimeStamps is true, the time stamps from the previous views are preserved. Otherwise, views are created with default time stamps.
This method can be used, for instance, to re-use the same setup with a different trajectory protocol applied. In the following example, we use the same setup with a GenericCarmCT once for an acquisition with a short-scan trajectory and then again for a wobble trajectory:
◆ removeAllViews()
| void CTL::AcquisitionSetup::removeAllViews | ( | ) |
Removes all views from the setup. Same as setNbViews(0).
◆ resetSystem() [1/2]
| bool CTL::AcquisitionSetup::resetSystem | ( | const CTSystem & | system | ) |
Sets the system of this setup to system. This creates a deep copy of system using CTSystem::clone(). The previous system is deleted.
system must be convertible to a SimpleCTSystem. Otherwise the system will be set to nullptr.
◆ resetSystem() [2/2]
| bool CTL::AcquisitionSetup::resetSystem | ( | CTSystem && | system | ) |
Sets the system of this setup to system. This moves system to this instance. The previous system is deleted.
system must be convertible to a SimpleCTSystem. Otherwise the system will be set to nullptr.
◆ setNbViews()
| void CTL::AcquisitionSetup::setNbViews | ( | uint | nbViews | ) |
Sets the number of views in this setup to nbViews. Depending on the current number of views, this has either of the following effects:
- If nbViews is less than the current number of views, all excess views are removed
- If nbViews is larger than the current number of views, empty views are appended to this setup to reach the requested number of views. The time stamps of the newly created views will continue from the time stamp of the last original view with the time increment between the last two views (if the number of views was less than two, the time increment will be 1.0).
◆ system() [1/2]
| SimpleCTSystem * CTL::AcquisitionSetup::system | ( | ) |
Returns a pointer to the system in this setup.
◆ system() [2/2]
| const SimpleCTSystem * CTL::AcquisitionSetup::system | ( | ) | const |
Returns a pointer to the (constant) system in this setup.
◆ toVariant()
|
overridevirtual |
Stores all member variables in a QVariant.
Reimplemented from CTL::SerializationInterface.
◆ view() [1/2]
| AcquisitionSetup::View & CTL::AcquisitionSetup::view | ( | uint | viewNb | ) |
Returns a reference to the View viewNb of this setup.
This does not perform boundary checks.
◆ view() [2/2]
| const AcquisitionSetup::View & CTL::AcquisitionSetup::view | ( | uint | viewNb | ) | const |
Returns a constant reference to the View viewNb of this setup.
This does not perform boundary checks.
◆ views() [1/2]
| std::vector< AcquisitionSetup::View > & CTL::AcquisitionSetup::views | ( | ) |
Returns a reference to the vector of views of this setup.
◆ views() [2/2]
| const std::vector< AcquisitionSetup::View > & CTL::AcquisitionSetup::views | ( | ) | const |
Returns a constant reference to the vector of views of this setup.
The documentation for this class was generated from the following files:
- modules/src/acquisition/acquisitionsetup.h
- modules/src/acquisition/acquisitionsetup.cpp